How to use Wireless Protection in Windows 11/10
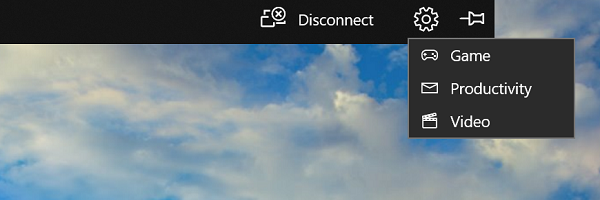
Starting with Windows 10 v1809, when you wirelessly project your Windows PC, you will have a control banner at the top of your screen. This is similar to the remote desktop control you get to see in the session. The banner offers information about the state of your connection. You can use this to quickly disconnect or reconnect to the same session but fine-tune the connection based on what you are doing. Tuning in simple words mean that Windows will optimize the latency to make sure you don’t have a slow experience. This option is available under Settings. Click on it, and you will have three options.
Game mode: This mode will minimize the screen to screen latency. This will improve gaming over a wireless connection.Video mode: This will increase the screen to screen latency to ensure video playback is smooth.Productivity modes: This is somewhere between the game, and video mode. It makes sure the screen latency is enough so typing looks in sync, and videos don’t glitch too often.
This works over any Wireless solution including Projector, Miracast, and so on. When doing so, make sure you are not really far away from the device. No matter how well this works, wireless projection works when they are in the optimal range. I will always recommend you to use Wireless Projection only to one screen, and not both the screen unless you need it. While it may work nicely when using the work mode, it might be too much to handle for your PC to display both on PC and TV screen simultaneously.