Visual Studio Code
Visual Studio Code is a lightweight IDE from Microsoft for developers to write code in the variety of languages like Python, PHP and more. It has inbuilt support for Git as well. This article is a step by step guide about Visual Studio Code, briefing about its different channels and how to install and use it properly. It is worth mentioning that Visual Studio Code is an open source project with its repository on Github. Secondly, it has two versions of the product that is available for download publically. The first one is the Stable release that sees an update once every 15-30 days at an average. And the other one is the Insiders release that gets an update almost every day. The main difference between the two lies in the channel’s name. The stable release is ideal for those who are very particular about not getting any interruptions even occasionally. The other one is the Insiders channel that is the beta release actually. It contains all the latest fixes while new and many times incomplete features are implemented and hence causes bugs occasionally. This does not mean that the Insiders version is not usable at all. The Insiders version is stable enough to not interrupt your daily tasks, but no one can call these beta versions reliable hence, it is expected that things may go wrong at some point or the other. Summing up, if you are an enthusiast who wants to try out new fixes and features earlier than others, you can download the Insiders version from the respective channel. The development team behind Visual Studio Code mentions this on the download page:
Downloading Visual Studio Code
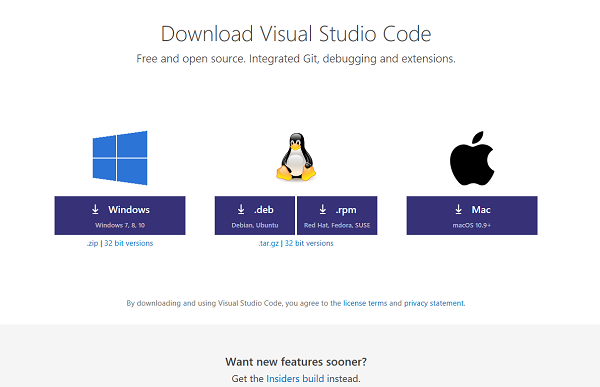
Downloading both the versions of Visual Studio Code is pretty simple. You just need to head to this webpage dedicated to downloads of Visual Studio Code and choose the package that matches your needs and requirements. As we can see in the screenshot above, it supports Windows 7, Windows 8, Windows 8.1 and Windows 10 for Windows platform. We can download a .deb file for Debian and Ubuntu and .rpm file for Red Hat, Fedora and SUSE. We can also get an x32 version or 32-bit version of the software for the operating systems just mentioned and obviously the .zip and .tar.gz archives for Windows and Linux respectively. Talking about Mac OS, you can get a package for your Mac computer, but you will need to make sure if you are running version 10.9 or newer of Mac OS. You can even get an Insider build of Visual Studio Code for Windows Platform, macOS and Linux flavors mentioned above from their dedicated page here.
Installing Visual Studio Code
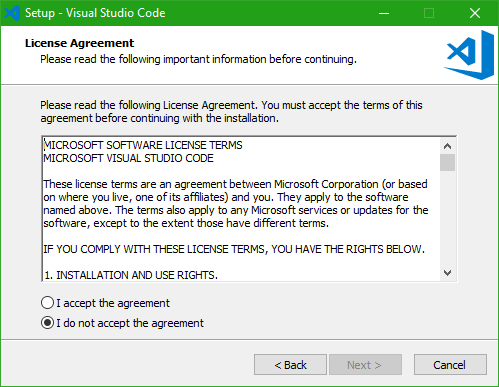
After you hit the download button for the package that matches your needs and configuration the most, the package will start downloading on your machine. Now, there are different ways to install this software on different operating system environments. We will concentrate on how to install it on Windows. I am using Windows 10 to install it, but the procedure is purely same for every supported version of Windows Operating System. So, now after you downloaded a file named as VSCodeSetup-version.exe, double-click on the file to install it. It will just take about a minute to install depending on how powerful hardware you are running. You will now get a UAC or User Account Control Prompt to which you will have to hit Yes. Then you will see a window like this-
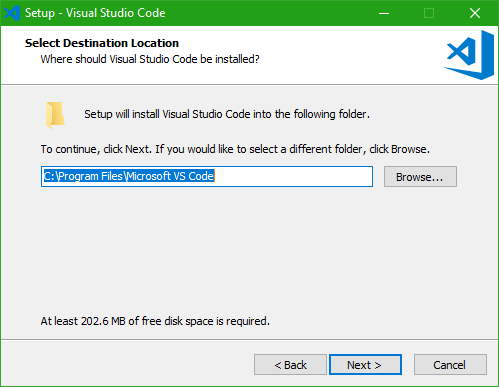
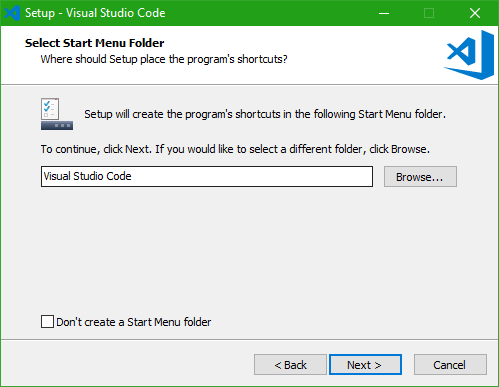
Now, hit Next to proceed further. Then you will see the License Agreement page which will look like this- Click on the I accept the agreement radio button and then hit Next. Then you will see a page that will ask and show the default path where Visual Studio Code will be installed. By default it is set to C:\Program Files\Microsoft VS Code but in case you want, you can change it to your custom and desired location too. Now hit Next to proceed further. Now the page will ask you if you want to create a Start Menu folder entry for Visual Studio Code. According to your preferences, you can now select if you want to or not create a start menu entry for VS Code.
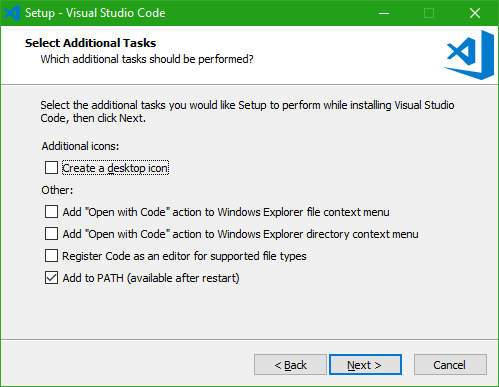
After hitting the Next button, the next page will show you some additional options as shown in the screenshot below that you can choose. After you are done, hit Next.
Then it will show you a summary of what preference you have selected to install VS Code, and according to that you can navigate either way and proceed with the installation by hitting the Install button. Now, it will show an installation progress bar. After the installation is done, hit Finish to launch start using Visual Studio Code. Now, this is the home page of a fresh instance of Visual Studio Code. You can create new projects or use your existing project folders. A wide variety of useful extensions are available for the IDE for you to be productive. You can use the smile icon on the right bottom corner to report any feedback you have in your mind. Hope beginners find this basic tutorial useful.